and another quicke

On: 7/27/2011

I've still been busy mostly with my UDK thing for the last couple days, and I think I'll soon have it in a state where I can actually show something without looking like a total boob.
Anyway, to get my mind off this thing a little, I felt I should spend some time with ZBrush again. Nothing fancy though.


quickie

On: 7/22/2011

~20 minute speed sculpt. Actually I was just showing a friend the incredible power of ReMesh and ProjectAll. Started from a super simple ZSphere rig, then ReMesh, initial sculpting, then major deformations like the horn and the ears, another ReMesh on that.
I get the feeling that ZBrush backwards spells freedom. Sorry Mudbox, you're out.


Besides that, I haven't been sculpting much the last two days, because I started working on a small personal UDK project. More about that soon.

let's keep this going, shall we?

On: 7/20/2011

Two more.


Frankenstein's bride was a, if you want to call it that, happy accident. I was actually playing around with the brush settings and created some sort of scaly alien brush, that kind of worked for hair too. Initially she was supposed to become some, well, scaly alien bust, but then my Z intensity went up and poof came the hair. I haven't put too much effort into it otherwise, hence the crappy symmetry and polypaint, but I wanted to go with that idea anyway, while it still felt fresh.

Second one is just another variation of my initial female base sculpt. For some reason, all those last years, I've barely done any female models, and I think that's one weakness I seriously need to work on. Far from perfect of course, but I'll just keep churning these things out to get a better feeling of the subject matter.

The basemesh of the sculpt is courtesy of the amazing guys at Sony Santa Monica btw. I don't exactly recall which of them made it, and the thread at ZBC became pretty big by now.
Speaking of their thread at ZBC, if you haven't checked out those guys' lunchbreak speedsculpt, you're seriously missing out. Really, go there now!

girl head update

On: 7/18/2011

I've been fooling around with her on and off today, but still not really sure where to go from here.

and something else maybe

Started out as a quick sculpt this morning, might turn into something more, who knows. The main reason was that I haven't made anything remotely female for years (save the corpse on the fat guy).


and it's been ages again

Well, I've grown kind of sloppy in updating this here thing. The last entry is now more than 6 months old and I've done a number of things since then. What exactly? Good question, I guess. Mostly teaching, some jobs here and there and the eternal mission to improve my workflows.
There's lots of things I can't show or won't show or that I just don't remember showing right now. One thing I can and will show, though, is a character I've finished a couple days ago.

Meet the fat guy.


Camo Pattern Generator

On: 12/15/2010

Edit: I'm posting this as an edit of the original post, in case you're wondering what's going on here. I've spent some more time on my Camo Pattern Generator Photoshop action. The biggest improvement is the new look of the digi camo pattern, which is a lot more realistic now, I think.

The usage is still the same, create a new document (something around 1024x1024 works best), select a background color and a foreground color (for the first pattern's color), run the script, change the remaining colors during runtime. You'll be asked if you want to turn the resulting camo pattern into a digi camo pattern.

The generated patterns, classic and digi, will both be seamlessly tileable.


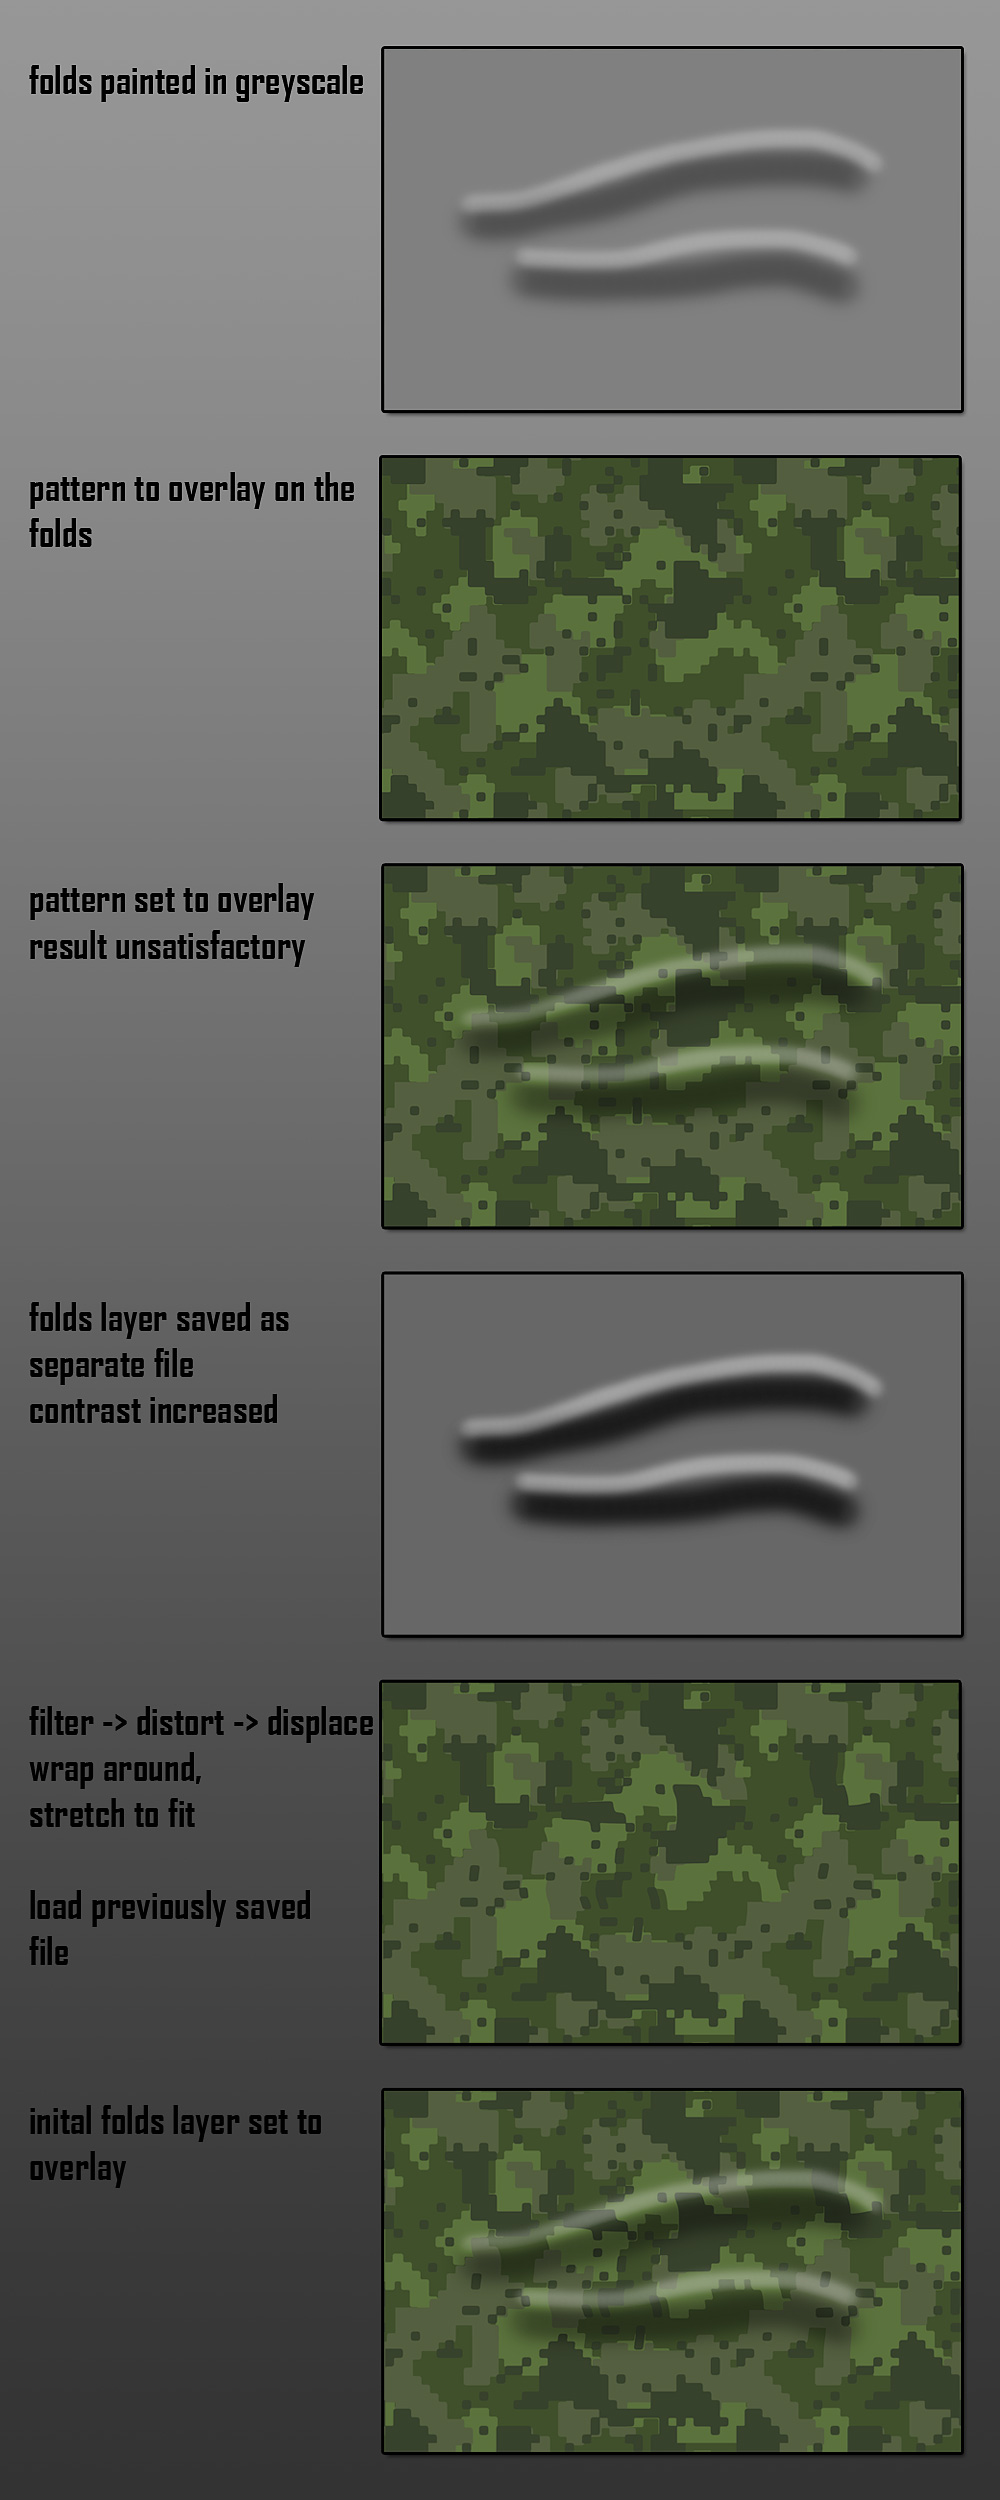
Btw, if you want to use the patterns on a 3D model, say a character's clothes, that has volumes, like folds, here's a little tip for you. Sorry for the sloppy illustration, I'm too lazy to look for my Wacom pen.


Old post:

A couple days ago, I was supposed to use a camo pattern on a flyer I was making for a friend, so I tried finding a decent camo pattern generator. I didn't have much luck though, so I played around with Photoshop to find my own easy way to create camo patterns.

My initial idea was to use four layers, that's one background and three additional layers, with slightly different colors. Then use a cloud filter on the layer masks and tune its levels until it's starting to form solid shapes.
While this produced acceptable results, I still wasn't 100% happy with the way the patterns looked.

Last night I started turning that workflow into a Photoshop macro, and while I was at it, I enhanced it a bit with filters, and the results were getting a lot better. Then I decided to add another function to the macro, that can optionally turn the oldschool camo pattern into a digital camo pattern. I'm still tweaking that last part, but I think the macro works good enough to release it to the public, maybe some of you find some use for it.

Camo Pattern Generator 1.1

(click to download)


It's compatible with Photoshop CS3 and up. The workflow is fairly simple. Your background color will become your background color and your foreground color will become the first camo color. The remaining two colors can be set during the macro.
For best results, I suggest an image size of around 1024x1024. Oh, and the generated pattern is also seamless.